


Snapping an Electron-based Application: Simplenote
Wed, May 18, 2016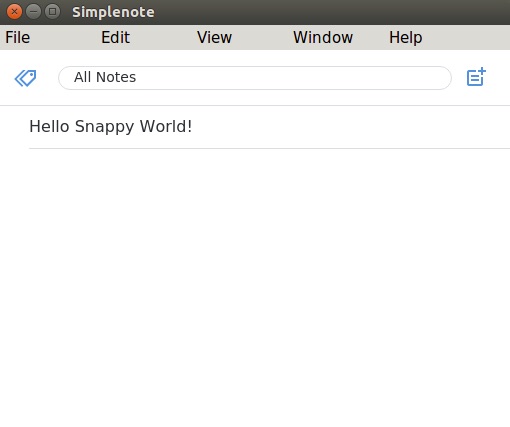
Snapcraft is described as a “delightful packaging tool”, enabling a developer to package their app from a single tree by aggregating the pieces from multiple places if necessary. It supports multiple build technologies and produces a .snap package with all its dependencies for Ubuntu Core and now the Ubuntu Classic Desktop (using snapd). It is the future of packaging for Linux-based systems. I encourage the reader to read the documentation on GitHub to get a flavour of what Snapcraft is and to learn more about the key concepts, setting up your system to produce snaps, and a nice first snap walkthrough example. For this post I am going to introduce a couple of concepts that served me well when snapping the Electron-based application, Simplenote.
Simplenote
Simplenote is a cross-platform note-taking application that uses Simperium to sync notes across Android, iOS, Mac, and of course Ubuntu (and other Linux systems). It has support for instant search, tags, note sharing, backups, and best of all it is free. This makes Simplenote a great choice if, like me, you use several systems on a daily basis.
Snapping Simplenote is relatively straight-forward but as I walk through the process below there are a few concepts that could help others snap applications. The rest of this post assumes you are using an Ubuntu 16.04-based system (VM, PC) and have installed snapcraft as per the instructions on the GitHub page.
Snapcraft
First we need to get the latest version of Simplenote from GitHub, at time of writing this was 1.0.1.
  wget https://github.com/Automattic/simplenote-electron/releases/download/v1.0.1/Simplenote-linux-x64.1.0.1.tar.gz
  tar xvzf Simplenote-linux-x64.1.0.1.tar.gz
Then we need to create our initial snapcraft.yaml file in the Simplenote directory to tell Snapcraft how to package the application.
  cd Simplenote-linux-x64
  snapcraft init
Running snapcraft init creates a barebones file ready for editing. For Simplenote you need the following, don’t worry about the contents just yet, I will point out the important bits soon.
name: simplenote
version: 1.0.1
summary: The simplest way to keep notes.
description: The simplest way to keep notes. Light, clean, and free.
apps:
  simplenote:
    command: wrapper
    plugs: [unity7, opengl, network]
parts:
  simplenote:
    plugin: copy
    stage-packages:
      - libnss3
      - fontconfig-config
      - gnome-themes-standard
    files:
      Simplenote: Simplenote
      wrapper: usr/bin/wrapper
      icudtl.dat: icudtl.dat
      snapshot_blob.bin: snapshot_blob.bin
      natives_blob.bin: natives_blob.bin
      resources*: resources
      libnode.so: usr/lib/x86_64-linux-gnu/libnode.so
      libffmpeg.so: usr/lib/x86_64-linux-gnu/libffmpeg.so
The first 4 lines of the file are there to describe details about the package itself including the name, version number, and a plain text summary and description. After that we get on to the sections that describe how the application is executed and what features it needs from the underlying system. command is the command to run on execution and plugs tells the system that this application wants to use the unity7, opengl, and network interfaces - all mandatory for Simplenote. You can read more about interfaces in Zygmunt’s series of interface articles.
As a side note, the command entry is a little different for this application as Simplenote (and other Electron-based apps) need a few environment variables set up before the actual binary can be called. This is accomplished by creating a wrapper script that does this set up. The contents of the wrapper file can be seen later in this post.
Back to the snapcraft.yaml file. The parts section describes what Snapcraft needs to do when creating the the .snap package. In this case we rely on the copy plugin that enables, you guessed it, copying of files from the host system during packaging to the snap package. The actual files to copy are listed in the files section. This copying is done to ensure that Simplenote has all the libraries and binary blobs necessary to execute once mounted within it’s snap-based confined area, running on a Snappy system. The format is:
file_to_copy: destination_in_the_snap
One entry that sticks out a little is the resources line:
resources*: resources
The use of the globbing wildcard ‘*’ ensures that the whole resources directory is copied across.
One section we skipped over was stage-packages. Snapcraft is a very clever tool and we benefit from it’s knowledge of Debian-based packages by stating in this section that we want to install libnss3, fontconfig-config, and gnome-themes-standard from the Ubuntu archive into the snap; again these are required packages for Simplenote.
Another side note. To understand what libraries are required by a binary like Simplenote we can use the ldd command:
ldd Simplenote
This produces an output that can be studied to understand where the binary is looking for its dependencies. Simplenote comes with a couple of libraries embedded in the package, namely libnode.so and libffmpeg.so and ldd shows these on my system as:
libnode.so => /home/jamie/snapping/simplenote/Simplenote-linux-x64/./libnode.so (0x00007fa6caa85000)
libffmpeg.so => /home/jamie/snapping/simplenote/Simplenote-linux-x64/./libffmpeg.so (0x00007fa6c5801000)
Notice that the entry after ‘=>’ points to local .so files in the Simplenote-linux-x64 directory, this means that we need to copy these over into the snap, hence the copy entry in the snapcraft.yaml file. All other libraries are present on the host system and will be used automatically by Snapcraft.
The wrapper file
The contents of the wrapper file discussed above are:
#!/bin/sh
export FONTCONFIG_PATH=$SNAP/etc/fonts
export FONTCONFIG_FILE=$SNAP/etc/fonts/fonts.conf
export XDG_DATA_HOME=$SNAP/usr/share
export LD_LIBRARY_PATH=$SNAP_LIBRARY_PATH:$SNAP/usr/lib/x86_64-linux-gnu/
exec "$SNAP/Simplenote" "$@"
There is nothing too exciting about this file, we set up the fonts path to be inside the snap directory itself (remember snaps are confined) as well as the share folder. We also set the LD_LIBRARY_PATH to ensure that the snap is looking for it’s libraries in the right location, namely $SNAP/usr/lib/x86_64-linux-gnu/. Again, looking at the snapcraft.yaml file you can see that we copy libnode.so and libffmpeg.so here to ensure Simplenote does not complain about missing libs. The last line executes the Simplenote binary.
The wrapper file needs to be executable so we do this using the chmod command:
chmod +x wrapper
Building and Installing
All that is left to do is build and install the snap.
  snapcraft
  sudo snap install simplenote_1.0.1_amd64.snap
This process will pull down any dependencies and create the squashfs-based .snap file. After this we should have a simplenote_1.0.1_amd64.snap file in the local directory ready to be installed with the snap install command. One caveat at the moment is that Simplenote will expect to use dbus and with AppArmor confinement this is not possible with the application we just built. It is possible to get around this but I will leave that as an exercise for a later post.
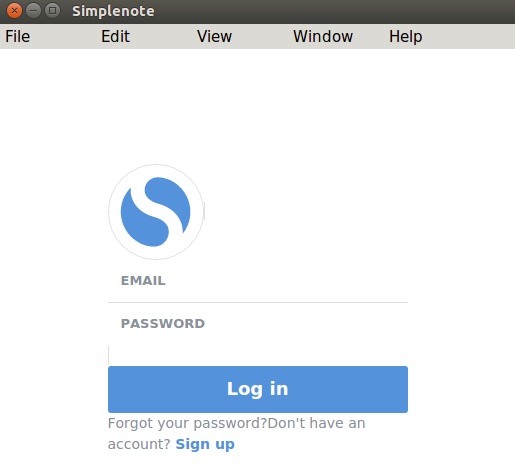
If you try to run the application using:
simplenote
You will see the following:

What we can do, which introduces a new concept nicely, is use —devmode. devmode allows the snap to break out of it’s confinement during development to quickly get up and running. From there you can look at what policy violations would potentially occur and adjust your application accordingly. When you are happy that your application is working in a confined environment you can simply install without devmode to test.
To install Simplenote with devmode you can use the —devmode flag:
sudo snap install —devmode simplenote_1.0.1.snap
Running simplenote now produces the following:
It is not perfect but that wasn’t the aim of this post. Instead we looked at packaging an application, copying files inside the snap using copy, using a wrapper file to set up a snap environment, and now to conclude lets introduce another little snippet of information to help you debug your snapping process: busybox.
Debugging snaps using busybox
Snapping an application is usually pretty simple but when you get stuck and just need to look inside the snap itself to see what is going on there is a simple trick to allow you to do this. Adding busybox as an application to your snap gives you to have a shell environment right there in the snap. This allows you to poke and prod at directories, seeing if files you thought you copied over are present, and generally debugging (you can also add gdb and other tools if necessary in the same way).
To add busybox we would modify the snapcraft.yaml file above as follows:
name: simplenote
version: 1.0.1
summary: The simplest way to keep notes.
description: The simplest way to keep notes. Light, clean, and free.
apps:
  simplenote:
    command: wrapper
    plugs: [unity7, opengl, network]
  busy box:
    command: sh
    plugs: [unity7, opengl, network]
parts:
  simplenote:
    plugin: copy
    stage-packages:
      - libnss3
      - fontconfig-config
      - gnome-themes-standard
    files:
      Simplenote: Simplenote
      wrapper: usr/bin/wrapper
  busybox:
    plugin: nil
    stage-packages:
      - busybox
Notice the extra busybox-related lines. To access busybox once the snap is installed you can use:
simplenote.busybox
Important directories are:
$SNAP - the snaps home directory i.e. /snap/simplenote/id
$SNAP_DATA - the snaps data directory in var i.e. /var/snap/simplenote/id
$SNAP_USER_DATA - the snaps user data directory i.e. /home/jamie/snap/simplenote/id
All of the above directories are on a Classic 16.04 Ubuntu system.
All code can be found at:
The next steps for this application are to sort out the fonts and menu spacing, add a .desktop file for dash discovery, get around the AppArmor violation, and upload to the store, but all of this is for another post.